3 Ways to Troubleshoot AC Motors with a Circuit Tester
An AC motor is not functioning as it should. What do you do? Before replacing the motor, here are three effective ways to start troubleshooting your AC motor using a circuit tester.
AC motors are among the simplest types of motors to operate. Once connected to power, they run at a specific speed and stop when the power is turned off. When an AC motor fails to work, the issue is often related to power or wiring problems. The key to identifying the root cause lies in isolating potential issues step by step.
What is a Circuit Tester?
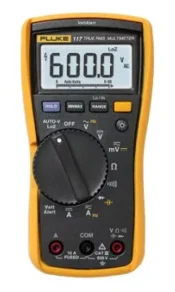
A circuit tester, also known as a multimeter or multitester, is an electronic tool that combines the functions of a voltmeter, ohmmeter, and ammeter. It can measure voltage, resistance, and current in a circuit. This device is essential for diagnosing electrical problems in various systems, including AC motors.
First, Check the Basic Wiring
When the motor is connected to a power supply but doesn't work, the first thing to do is check the wiring and ensure all necessary components are in good condition. Since there could be many elements in the power circuit that affect the motor's operation—such as relays, switches, or controllers—it’s best to start with the most basic setup. This means connecting the AC motor and capacitor directly to the power source. If the motor works, you can gradually reintroduce the other components to identify any faulty ones.
| A circuit tester (also known as a multimeter or multitester), is an electronic measuring instrument that combines functions from a voltage meter, an ohmeter, and an ammeter. A typical circuit tester can measure voltage, resistance, and current in a circuit. | |
TIP: Many AC motor issues stem from faulty components or incorrect wiring. To make troubleshooting easier, isolate the problem by starting with the most basic circuit. Once confirmed, test each component individually as you add them back into the system.
Three Key Tests with a Circuit Tester
Here are three methods to help identify the cause of an AC motor issue:
|
1. Compare the applied voltage with the capacitor terminal voltage. |
TEST 1: Compare Applied Voltage with Capacitor Terminal Voltage
If the motor is properly connected, the capacitor terminal voltage should be approximately 1.7 times the power supply voltage. This confirms whether the motor is receiving the correct voltage.
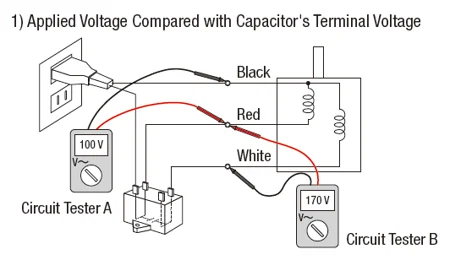
Using Circuit Tester A, connect the red probe to the exposed part of the red wire and the black probe to the black wire. Ensure good contact and set the tester to AC voltage mode. If correctly connected, Circuit Tester A will show the power supply voltage. For example, if the motor is rated for 100 VAC, the tester should read 100 V.
Now use Circuit Tester B to measure the voltage between the red and white wires. If everything is working properly, the reading should be around 170 V, which is 1.7 times the power supply voltage. This helps confirm that the capacitor is functioning correctly.
TEST 2: Verify if Electricity is Conducted Through the Cable
A break in the motor's circuit can prevent it from operating. To check for continuity, use a circuit tester to see if the circuit is closed or open.
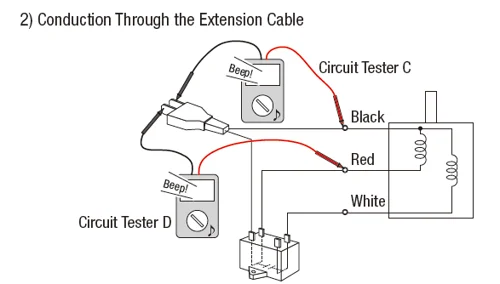
Turn off the power and use Circuit Testers C and D to check the continuity of the cables. Connect the probes to the exposed ends near the motor and the power source. If the circuit is intact, the tester will beep.
TEST 3: Verify Motor Winding Resistance
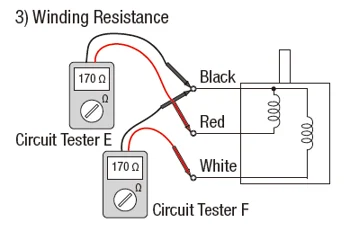
Measuring the motor's winding resistance and comparing it to the original design values can help determine its electrical condition. Before testing, remove any additional components like extension cables and capacitors. Set the circuit tester to resistance mode and connect the probes directly to the motor's lead wires.
For a 100 V motor (model: 2IK6A-JA), the resistance should read 170 ohms. If the winding is broken, the tester will show a very high value, while a short circuit will result in a lower reading. Always refer to the manufacturer’s specifications for accurate values, as there may be a ±10% tolerance.
What to Do If Your Motor Fails These Tests?
If the motor does not pass these tests, it could indicate a faulty component or a damaged motor. Common issues include bad switches, relays, cables, or incorrect voltage. These tests can provide valuable clues about what needs fixing.
|
If your motor doesn’t pass Test 1, check or replace the capacitor or wiring. If your motor doesn’t pass Test 2, check or replace the cable or connector. If your motor doesn’t pass Test 3, replace the motor. |
Mechanical issues, such as damaged bearings due to excessive load, can also cause motor failure. To test this, remove the motor and gearhead and try rotating the shaft manually. If it feels stuck or makes unusual noises, there may be internal damage. In such cases, replacing the motor and/or gearhead is recommended.
Understanding your motor better can improve your troubleshooting skills. Explore these related posts to expand your knowledge on AC motors or reach out to our technical support team for assistance.
|
Related Posts: |


 hbspt.cta._relativeUrls=true;hbspt.cta.load(2284573, 'cf5fb627-a9ca-489c-9f5a-f0e28f4bc7a9', {"useNewLoader":"true","region":"na1"});
DADMAC for Water Treatment and fixing
Water Treatment Dadmac Polymer,Fixing Agent Dadmac Polymer,Cosmetic Industry Dadmac Polymer,Multi-Fuction Fixing Agent
ZHEJIANG XINHAITIAN BIO-TECHNOLOGY CO.,LTD. , https://www.dadmacxht.com